텐서플로우는 기본적으로 맥/리눅스 환경에서만 동작한다.
하지만 docker를 이용해서 윈도우 환경에서도 tensorflow를 사용할 수 있다.
docker를 이용해서 윈도우 환경에서 tensorflow를 사용하는 방법을 알아보자.
Step 1
docker를 설치하기 위해선 아래의 조건을 만족해야 한다.
1. 64-bit 운영체제여야만 한다. (2016/10/05 – 이제 32-bit 운영체제도 지원한다고 하네요 – Souless님의 제보 – https://docs.docker.com/v1.7/machine/install-machine/#install-docker-machine 참조)
2. 윈도우 버전이 윈도우 7 혹은 그 이상이여야 한다.
3. OS에서 가상화(Virtualization)가 가능해야 한다.
조건 3을 확인하는 방법은 아래와 같다.
Widnow 8 혹은 8.1의 경우
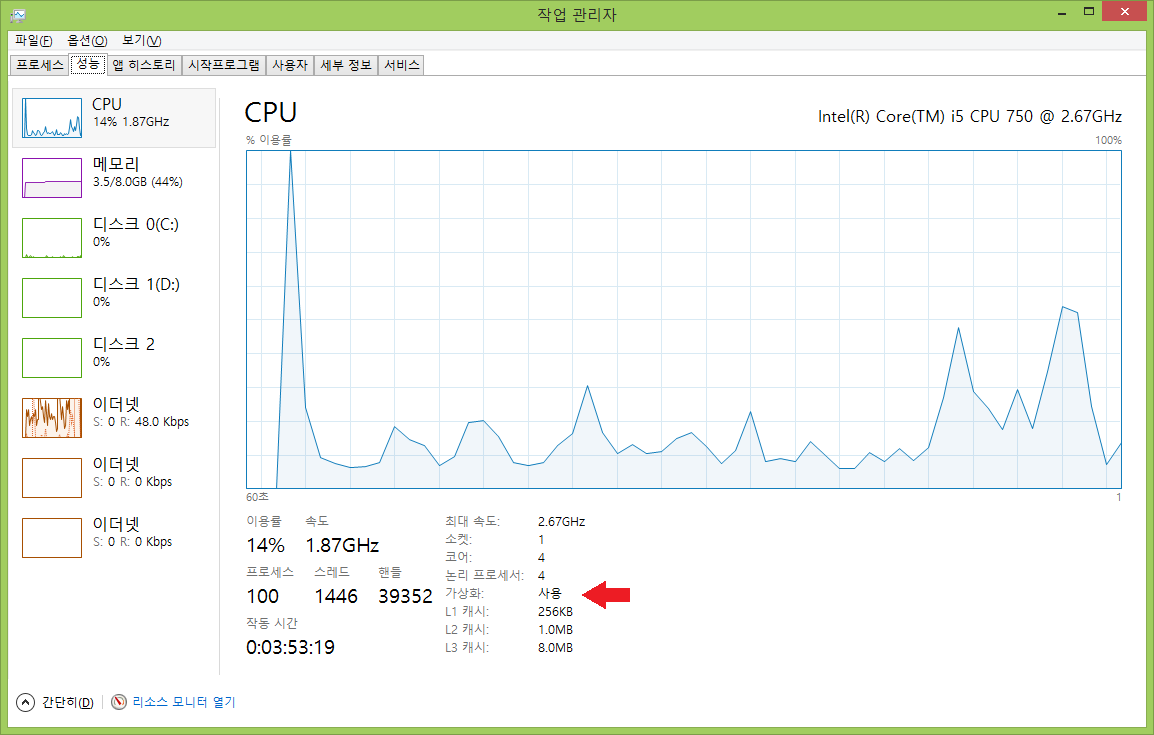
작업 관리자의 성능 탭에서 위와 같이 가상화 부분이 사용이라고 나와 있으면 가상화가 사용 가능한 상태이다.
Widnow 7의 경우
https://www.microsoft.com/en-us/download/details.aspx?id=592
에서
Hardware-Assisted Virtualization Detection Tool을 다운로드 한다.
다운 받아서 프로그램을 실행했을 때

위와 같이 This computer is configured with hardware-assisted virtualization라는 메세지가 나오면 가상화를 지원하는 하드웨어가 존재한다는 뜻이므로 docker 설치를 계속 진행하면 된다.
Step 2
위의 설치 조건을 만족하면 이제 아래의 URL에 들어가서 docker toolbox를 설치하자.
https://www.docker.com/products/docker-toolbox
Step 3
docker 설치를 완료했다면 Docker Quickstart Terminal을 실행한다.
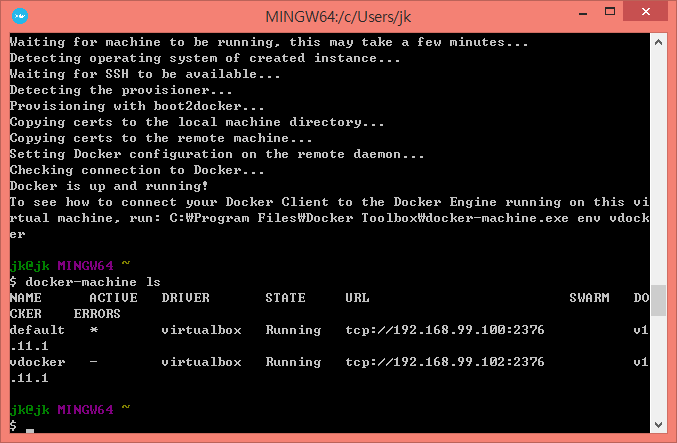
Docker Quickstart Terminal에서 아래의 명령어를 입력하면 현재 사용가능한 docker machine의 리스트들이 나온다.
$ docker-machine ls
이제 아래의 명령어로 vdocker라는 이름의 새로운 docker machine을 생성한다.
$ docker-machine create vdocker -d virtualbox
Step 4
이제 윈도우 cmd prompt를 실행한다. (Docker Quickstart Terminal 창이 아니다.)
그리고 아래의 명령어를 입력한다.
FOR /f "tokens=*" %i IN ('docker-machine env --shell cmd vdocker') DO %i
Step 5
드디어 마지막 스텝이다. 윈도우 cmd prompt 창에서 아래의 명령어로 tensorflow를 설치하자.
docker run -it b.gcr.io/tensorflow/tensorflow:latest-devel
tensorflow의 설치가 완료되면 자동으로 리눅스 터미널 창으로 넘어간다.
이제 python을 켜고 아래의 코드를 입력해서 tensorflow가 제대로 설치되었는지 테스트해보자.
$ python
…
>>> import tensorflow as tf
>>> hello = tf.constant(‘Hello, TensorFlow!’)
>>> sess = tf.Session()
>>> print sess.run(hello)
Hello, TensorFlow!
>>> a = tf.constant(10)
>>> b = tf.constant(32)
>>> print sess.run(a + b)
42
>>>
만약 jupyter notebook으로 실행하고 싶다면 아래 명령어를 입력한다.
docker run -p 8888:8888 -p 6006:6006 -it b.gcr.io/tensorflow/tensorflow
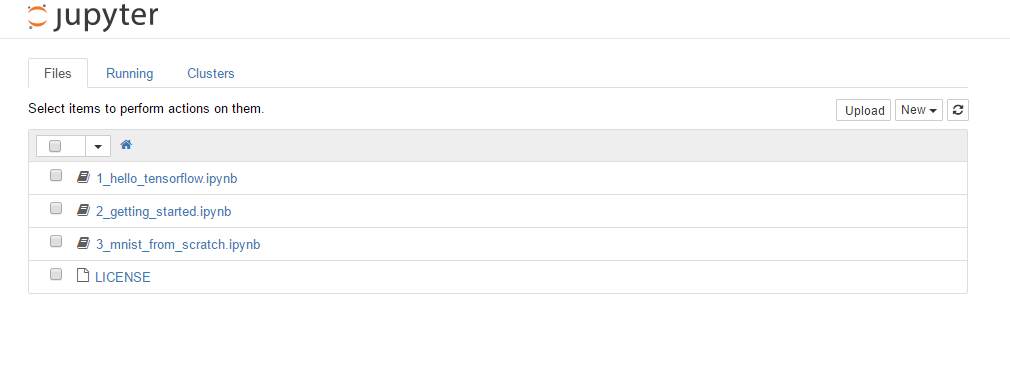
juypter notebook이 실행되면 인터넷 브라우저를 통해 docekmachineip:8888 포트로 접속한다.
dockermachineip를 확인하는 방법은 Docker Quickstart Terminal 창에서 아래의 명령어를 입력하면 된다.
docker-machine ls
위의 스크린샷에서 볼 수 있듯이 필자의 경우 192.168.99.102:8888로 들어가면 아래와 같이 juypter notebook이 실행된 모습을 볼 수 있었다.
References
[1] http://www.netinstructions.com/how-to-install-and-run-tensorflow-on-a-windows-pc/
[출처] 솔라리스의 인공지능 연구실 : http://solarisailab.com/archives/384
재부팅후 다시 실행할 시 docker 를 실행할 필요는 없어보이고 CMD 창에 아래 3줄을 순서대로 실행후 작업하면 될거같다.
FOR /f "tokens=*" %i IN ('docker-machine env --shell cmd vdocker') DO %i
docker run -it b.gcr.io/tensorflow/tensorflow:latest-devel
python